
How Video can Improve your TGU: Videoception
“There are three classes of people: those who see. Those who see when they are shown. Those who do not see.”—Leonardo da Vinci
Everyone knows Leonardo was both artist and inventor. But the Florentine genius was also an accomplished architect for the Medici and the Borgia. In his work for the military of the time, he knew the key to building strong structures lay in the proper distribution of forces. In particular, he knew that straight lines are almost always stronger than broken lines and angles.
The get-up is one of those exercises where structure is key. With the weight supported overhead throughout the movement, it is the careful distribution of forces that provides the opportunity to perform this skill safely and efficiently while progressively increasing the challenge.
Structure and Stability
Bones provide the structure. Muscles stabilize. Don’t confuse one for the other.
As trainers, our eyes are key in helping a student structurally align those bones throughout the get-up stages to minimize the muscular effort needed to stabilize the kettlebell. But how to improve our get-up when no other trainer is available to give us feedback? How to get ready for an SFG certification or re-certification? How do we ensure great technique when demonstrating? How can we own every bit of the movement pattern when our goal is to work on a heavier bell for a Simple & Sinister protocol?
Unless we are practicing unloaded, or “naked” get-ups, mirrors are not a good option. For safety reasons and as one of our StrongFirst standards, our eyes should be on the kettlebell for most of the exercise, especially when we are closer to the floor—precisely when the structural alignment is the most challenging to achieve. A mirror encourages looking elsewhere.
Enter the Videoception
From Leonardo’s quote above, we want to be “those who see.” Interestingly, video means “I see” in Latin. So, video-assisted proprioception, or videoception, is a tool that every trainer and practitioner should master. I’m not talking about the typical practice videos seen on Instagram or Facebook. I‘m talking about using a software application to study snapshots of the get-up to fine-tune alignments and distribution of forces. Sounds geeky? It’s not (well, maybe a little). But it’s a simple 4-step process:
- Film yourself doing your get-up. Carefully plan your shooting angles as they are critical—more on that later.
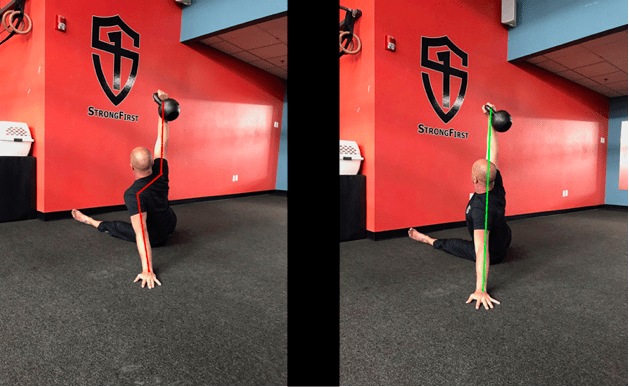
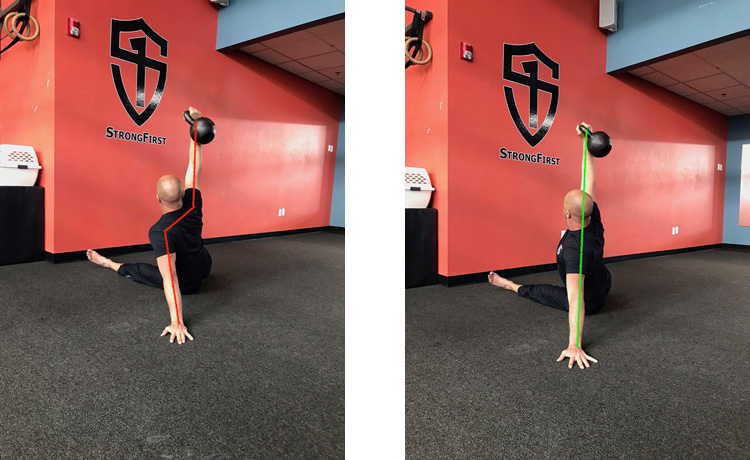
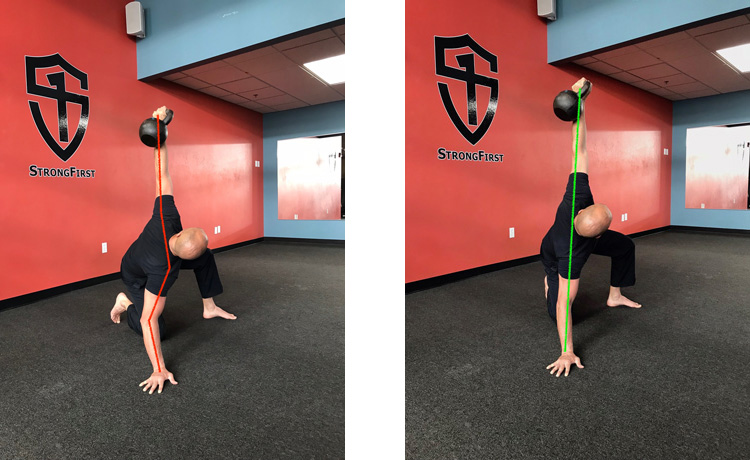
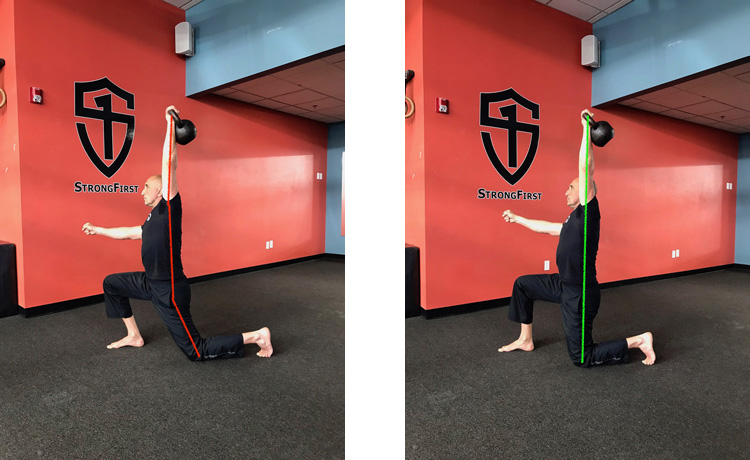
- Superimpose lines on your video to check how gravity affects the weight you are carrying overhead. Appreciate that even subtle improvements can yield great results.
- Repeat the skill and adjust your position according to your observations. Focus on how it feels to improve your proprioception of what the optimal movement or placement should be.
- Repeat these three steps until you have optimized your movement.
Choose a good video analysis app or software* that allows you to draw the appropriate lines of force and keep them superimposed with your body throughout the get-up, or at least the different steps of the movement. See the footnotes for a few suggestions.
If you’re using photos instead, a simple photo-editing program will allow you to draw any kind of line connecting main joints (shoulders, hips, wrists, etc.).
Smile, you’re on Camera
The key is finding the best angle(s) to shoot those videos. Think about the feedback you seek. Some alignments are more critical than others. Do you think you lose structural alignment when going from standing to lunging? Position the camera or smartphone at your side. If you are more concerned about the elbow-to-hand transition, consider shooting from behind, with the camera closer to the ground. Look for the desirable straight line between the kettlebell, your wrist, your shoulder and your opposite sit bone that is supporting the load.
In the beginning, bell down. Execute the get-up slowly, pausing at every step to clearly analyze the movement on screen. The goal is not to capture what you do when you know you are being watched but the patterns you gravitate towards more naturally. Candid rather than rehearsed camera. You’ll probably need a few takes to find the right camera height and angle for each step, and to relax. Resist asking someone else to move around you with the camera as it will introduce camera shake that makes the feedback less reliable. Instead, leave it in a fixed and stable position, ideally on a tripod. It will allow you to experiment with fewer variables and speed up your learning.
Also, and from a quiet professional perspective, resist posting your personal coaching video on social media, mixed in with cats and bloopers. It’s a tool for your own improvement. Use it that way. It is also an excellent tool to help your students improve their technique, access their strength or increase their feeling of safety. Many of them cannot feel when they are out of alignment. Use the visual feedback to supplement the drills and cues you already provide.
Stay tuned for a follow-up article, where I explore how outlining and framing improves your get-up.
Give videoception a try and let us know what you learned from it. Share your thoughts, experiences, and comments on our StrongFirst online forum.
*Video software and apps you can try: Coach’s Eye (for iPhone), ObjectusVideo (for Mac) or their equivalent for PC (MotionPro) and Android (PowerChalk).